Tuesday, August 4, 2015

Another Christmas in July Card


Here is another item that was made during our Christmas in July themed meeting.

I like the elegance of this card and that it looks nice folded and displayed upright.
I borrowed the folding technique from Pinterest.

Here are the materials you will need to create this card along with the item number from Stampin' Up!

 Black Cardstock 12 X 12 (#124267) this will be cut into a piece that is 12" x 5 1/2"
Whisper White Card Stock (# 100730) used for the sentiment - a strip that is 2" X 3 1/2"
You will also need a square for the Wreath that will be embossed.
Cherry Cobbler Cardstock (#119685) for bow
Bow builder Punch (#137414) 
 Heat Tool (#129053)
Wondrous Wreath Stamp Set (#135047)
Wondrous Wreath Die Cut (#135851)
These two can be purchased as a bundle to save $: #137624
Gold Embossing Powder (#109129)
 Cherry Cobbler Dazzling Details (#125585)

To create your template for the folding card:
Cut a 5 1/2 x 12" strip of paper
Score lines: 2",4",8" and 10"
At short end measure up from corner 3" and connect that to the 4" score line (see video).
You will cut along this line and remove a triangular portion.
Repeat at other end marking up from corner 3" then connecting that mark to the 8" mark.
Here is a quick video.

The tutorial to make this card can be found here!


Monday, August 3, 2015

Christmas In July Continues!


This is a different shaped card made by an 8x8 piece of card stock folded in half.  It does fit into a business sized envelope.

The ingredients to make this Swag card:

Tip Top Taupe Card Stock (#138336) cut into an 8 x 8" square
Cherry Cobbler Card Stock (# 119685)
Whisper White Card Stock (# 100730) Cut into a 7 x 3 1/2" strip
Green Card Stock (I used Wild Wasabi: #108641) - you will need 1/2 of a 8 x11" sheet cut length wise for the three wreaths.
Wondrous Wreath Stamp Set and Thinlits:  #137624
 Mossy Meadow Stamp Pad (#133645)
Versa Mark Stamp Pad (#102283
Hole Punch (#134364)
Crystal Effects (#101055)

I created a video showing you how to make it here!


Saturday, August 1, 2015

Make your own "Berries" or Candy Dots

I discovered this on Pinterest of course and tried it.  My club loved this trick and so do I. This is something you will want to complete before your project.  I would suggest at least a day before.

To create these Candy dots:

Wax Paper
Multi-Purpose Liquid Glue
Card Stock in Color of your choice
Hole Punch
Crystal Effects: this is used to create a glossy, lacquered look to items and can also be used to attach heavy embellisments.

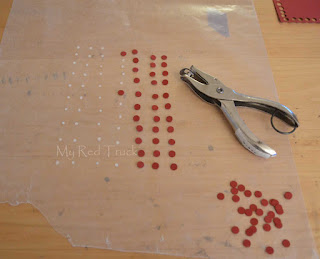
To start place dots of glue on your wax paper using the Multi-purpose glue.


I prefer to let this dry a bit however you can proceed to the next step, just be aware you will get glue on your fingers!  Have a wipe handy.

The next step is to take your hole punch and start punching out circles out of your chosen card stock.  You will then start placing the dots of card stock onto your glue dots on your wax paper.

Now you can understand why you want to do this ahead of time.  So turn on your TV or listen to your audiobook and sit down!

After all the dots are down you will need your Crystal Effects.

In a circular motion apply the crystal effects to the surface of your dot.

Now you wait!  This takes about an hour to dry and don't panic if it is a bit milky when you first put it on.  It will dry clear and very shiny.

I like using these on the Wondrous Wreath stamped image as berries.  They are a bit larger than the berry stamp that comes with the set.  I am posting a card that I used it on.

Happy Stamping!  Oh and if you have questions or need advice on this process please email me!